Monday, 30 January 2012

Winter Hats


Here are my top 3 hats for Winter, that could take you through the chilly Spring too.
 
The Feather Trim Fedora
I have to be feeling quite confident when wearing this hat, even though I know its very much in style and fashionable I've got to get the rest of my outfit looking 'just right' in order to pull the look off successfully.

Accessorize, £24
I wear it with my Barbour coat, brown flat knee boots, a long chunky cardigan, like this one from Topshop, thick wooly tights, and some shorts to smarten up the look.
This hat is tricky to wear with our English weather, as it even says on the label 'Do not wear in rain', making it quite impossible to find a day that is neither windy or raining. My advice is to pack a plastic bag or reusable canvas bag in your handbag that the hat could fit into, that way if you're fine if you're caught out by out unpredictable weather. 

Beanie
I own numerous beanies, but this is my all time favourite (for this year anyhow!). The grey wool makes it very versatile and coordinates with most outfits. And the fur bobble is in keeping with the massive fur trend that is upon us, and adds a fun aspect to the hat.
Gap, around £15
Faux Fur Headwarmer
This is perfect when you're wanting to look 'put together' and sophisticated. I got this in 2010 from Urban outfitters, but can get their newest version in the sale now. I like wearing it with a deep plum or red lipstick for extra glamour!

Urban Outfitters, around £15
None of these hats are available anymore, but similar designs are still in the shops they were originally bought from.

E x

Thursday, 26 January 2012

Weekend Baking

Baking is a great for something to do when you've got a quiet weekend, and you've got the whole week to enjoy your creation!

I made this yummy Victoria Sponge cake last weekend. I decorated it with pink butter icing and hundreds and thousands to give an eye-catching finish.

Here's the recipe to make your own..

Ingredients for Sponge:
4oz Caster Sugar
4oz Self Raising Flour
4oz Margerine
2 eggs
1 level teaspoon of Baking Powder

1 - Put all ingredients into a mix bowl and beat with a wooden spoon until mixture is a smooth, creamy texture. Or put a food blender, which is alot easier.
2 - Distribute evenly between 2 round baking tins that are 6.5/7 inches wide.
3 - Cook for about 25mins at 160oC. Sponge should be a golden brown.
4 - Leave to cool in tins for 5mins, run a kinfe round the edges to loosen the sponge out of the tin, then put on a cooling tray for about 30mins so it can cool further.

Ingredients for butter icing:
3/4oz Margerine
1/4 table spoon Milk
2oz Icing Sugar

Beat ingredients together until a thick paste. You'll notice this doesn't look very much, but you only need a thin layer of icing on the top, otherwise the cake becomes too sickly. I added red food colouring at this point, you only need a tiny drop.

Layer jam on one side of the sponge put the other sponge on top. Smooth the icing with a spatula over the top. Hundreds and thousands are optional..

Yummy Scrummy

E x

Tuesday, 24 January 2012

All About The Eyes


Gel Liner is a great alternative from Liquid eyeliner and Kohl. I think its the best of both as it has the long wearing, durability of the Liquid eyeliner, and if you choose to, have it soft round the edges like Kohl.

It comes in a little pot, I use Bobbi Brown's Long Wear Gel Eyeliner , this link also has a very useful 'How to' Video at the bottom. It costs £16.50 from Bobbi Brown, this has a great consistency, applies well and lasts all day. 

You could however pay half that for Maybellines version. I haven't used this one myself, but the famous makeup artist Lisa Eldridge has used it on her website and has great reviews on the Boots website, so I'm confident it will work just as well as Bobbi's!

Application:
  • Use a fine brush to apply, as you can always make the line thicker if you want.
  • It can be worn on a bare eyelid or on top of eyeshadow, depending on your desired look. 
  • I like applying one thin coat of mascara first, so that when you run the brush along the lash line the gel has some structure to stick to and gives a stronger line. Then apply a second coat of mascara for a really powerful effect.

Gel liner is also very versatile, as you can create a strong 70's cat-flick from the corner of the eye. Or keep the line close to the lashes, use a small blending brush (or a cotton bud) and blend the line into the eyeshadow, to create a smokey blend of colour. This gives definition but doesn't look too perfect and 'done'.

E x

Monday, 23 January 2012

Daily Beauty Routine

3 words.. Cleanse, Tone, Moisturise!
This should be your routine every morning and night, no matter how tired or busy you are.. It really does help your skin immensely - evening out your complexion and reducing spots and blocked pores.


1 - Cleanse
This should clear every scrap of makeup off at night. If you have foundation/mascara on your towel, you know you haven't done it thoroughly enough! Squeeze a fifty pence sized piece out onto your hand and rub it into your face. Then wipe it all off with a cotton wool pad. This may need to be repeated depending on how much makeup you're wearing, as one wipe doesn't always pick up all the makeup.

Added Extra - Here I like to give my face a good wash with some Clinique soap, ensuring my skin is squeaky clean. Its best to get a soap/facewash that matches your skin type - so if you've got greasy skin choose one that will help dry your skin out.

2 - Tone
Toner will remove any last trace of makeup and cleanser. Dispense onto a cotton wool pad, and wipe all over your face; making sure you go up into you hairline as some makeup may still be there.
I use the Simple range for my beauty routine, its 100% perfume free so is delicate on your skin. The toner will help soothe and improve your skin's condition as it contains chamomile and witch hazel.

3 - Moisturise
Even if you have oily skin, the first two steps will have stripped your skin of its moisture, so you need to replenish it with a moisturiser that again suits your skin type and the time of year. Winter will dry your skin out with the cold air and central heating, so I recommend using a rich, thick moisturiser such as Derma Intensive Relief from Simple , which is delicate on dry skin. And for the summer months, Simple Light moisturiser, which doesn't clogs your pores. Both very cheap and I find they do their job very well!

Added Extra - its a few months off yet, but when the sun starts to shine more, you should always wear a layer of sun cream on you face, or a moisturiser with a high SPF - this is to stop premature aging (wrinkles). There'll be more on that later...

E x

Saturday, 21 January 2012

All That Glitters Is Gold

I work near a beautiful jewellers called Laura Lee and always admire the lovely window displays that change every season.

This Christmas I became the proud owner of one of the bespoke necklaces. Many of her items can be made to your specifications. I wanted a simple gold necklace with a small disc with an engraved message and a pearl charm. Similar to this one.

I wasn't sure what to have engraved, so I went with one that already existed on another of their necklaces in the shop: "rien que toi moi nous"… Which is something along the lines of "just you, me, us".


The simple design makes it very versatile and can complete most looks day or night.

E x

Thursday, 19 January 2012

Beauty Bargains - Travel Mini's

Today I bagged myself some travel sized shampoo, conditioner, hairspray and shinespray by Mark Hill from Boots. Yesterday they reduced their sale items by 75%, so this set only set me back £2.50! You'll have to get yourself to the stores though as the sale stock is no longer online.

E x

Wednesday, 18 January 2012

Laptop cases can be fun!

Here's my new netbook case from Marc by Marc Jacobs (bought from Selfridges)


I wasn't daring enough to go for the fluro colours that are in the collection, so I thought I'd for this gun-metal grey colour as is a bit more interesting than black and you can see the prints easily. I also wanted a case that was slim-line as my netbook, making it easy to fit in my handbag and take on my travels.

I love its neoprene texture (foamed neoprene is what they make wet suits from), so you can imagine is spongy, yet sturdy feel. I feel confident that my netbook is being looked after well..

E x

Luxurious Moisturiser

Clinique have a fabulous set on offer to combat your dry winter skin (as previously mentioned here) - from the 'Deep Comfort' range. It contains a tub of body butter, a hand and cuticle cream, and a moisturising body wash.

Left - Deep Comfort Body Wash
Middle - Deep Comfort Body Butter
Right - Deep Comfort Hand and Cutilce Cream

Its 100% fragrance free, which I really like for days that I want to let me perfume 'do all the talking' and the thick texture makes sure you're moisturised all day.

E x

Sunday, 15 January 2012

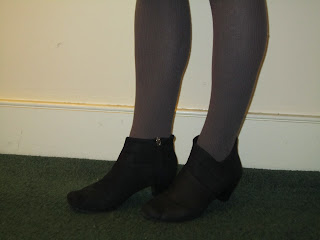
Little Boots

This winter I was in search for some ankle boots that could take me from day to night - so I needed them not to be too high, sophisticated, but also fun. Then one day, I found my answer in.. wait for it, Clarks!

I thought these were a blog-worthy purchase as I don't think Clarks get enough credit for their fashionable and on-trend designs.

E x

Beauty Essential - Handcream

As we get older, our hands can really give away our age. So to keep forever young, moisturise your hands every day - preferrably one with an SPF. Hard water and winter can really dry your hands out, so I use a really thick moisturiser from Neutrogena.
One tip is to apply your hand cream just before you to sleep, that way it can absorb into your skin all night. Having well moisturised hands also makes for stronger nails as they won't be as brittle and cuticles shouldn't peel either.
E x

Dear Diary

Every Christmas I get given a new diary for the following year. This year was no exception I was given this gorgeous diary from Liberty of London. Its from their prints collection, where every few weeks there is a double page of beautiful designs of the traditional Libery prints. This diary is so special I've even bought it its very own pen (this pink beauty from Parker).


I know I'm going to keep this diary for a long time, so I'm making an extra effort to write little memos on most days so it will nice to look back on in years to come.

E x

Naked Eyes

The 'Naked' palette from Urban Decay is the most perfect array of eyeshadows that you will ever come across. Fact. Its ideal for day-time eyeshadow with the pearly beiges and mid-tone fawns and browns, then it can carry you into night-time with bold black and dusky grey - great for the smokey eye look.


There is now a Naked 2 palette, which is the newest edition to the collection and looks like it has lighter tones which should work perfectly for spring and summer.

E x

Anyone for tea?

I am now well on my way to having a full tea set. Rather than going for the matching collection, I thought it would be more quirky and unique to have a mis-match of different brands and designs.

I loved this Portmerion design for the tea-cup and saucer as soon as I set eyes on it a few years ago. I don't think they make it anymore, but you can get an equally pretty design from their current collection.

This cup and saucer started my collection, and I now have a little milk jug and very retro tea pot that clashes in just the right way!

On the left is my 'On-the-go' cuppa tea from Urban Outfitters.


And although not directly related to my tea set I just have to mention my lovely Cath Kidson apron, which compliments the very girly crockery perfectly.

E x

Monday, 9 January 2012

Handbag Ballerinas

How often do you find your feet are in agony at the end of a night out or a hard days shopping.. all because of your high heels?
Well I think I've found the answer to your pain.. GAP's fold-up leather ballerina flats.They have a split sole so fold up in two and come in a material pouch - perfect to put in your handbag for when you've had enough of your heels!

I've got them in khaki green and black, so both my summer and winter outfits are sorted.

E x

Sunday, 8 January 2012

New Nails

To try keep some festive joy in this glum month, I purchased this sparkly nail varnish set from Models Own. You can get the set from River Island, unfortunately its now out of stock on the internet.. But the separate colours can be bought from the Models Own website.
Black - Mixed Up
Pink - Pink Fizz
Silver - Juicy Jules

Each shade gives a strong enough colour with two coats, but to add more depth to the colour I paint a complementing shade underneath before putting the glitter on top. If you're not brave enough to go the whole hog and paint every nail in glitter, why not just do your ring finger (see blow), or the tips like a french manicure!
The other nail varnish I'm wearing in the photo is by Mavala in the shade 'Miami'.

E x

Perfect Primer

I recently came across Urban Decay’s Eyeshadow Primer Potion.

There were rave reviews on a few websites about this product so I thought I had better give it a try.. It has a fleshy colour to match well with your natural eyelids, glides on well and you only need a dot. Having used it for a few days now, I can safely say that the powder eye shadow I put over the top does not crease at all and stays put all day. It also gives extra ooomph to the eye shadow colour too. I like putting on the skin by my lower lashes as when I create the smoky eye effect the colour really sticks to it and makes it stand out more. Thumbs up from me.

E x

Bronzed Beauty

I absolutely love Mac makeup and I finally bought the Mineralize SkinFinish in Gold Deposit, that I had my eye on for a while now. It’s going to be perfect for giving my tan an extra boost in the summer, but I'm using it sparingly on my cheeks to give a healthy sheen to my dull winter skin. The colour is very intense so you don't need a lot, and it creates a gorgeous shimmer!
E x

Smelling Sweet

I was given this perfume for my birthday this year; Versace Por Femme

It’s a clean fresh scent that could be worn all year round and by any age. A timeless classic and well worth a try!

E x

The Cheats Guide to Luscious Long Locks

I've had long hair for all my life, and want to grow it even longer and thought hair extensions would be the perfect answer to curb my impatience about getting longer locks.
I came across a great selection of extensions in the beauty shop Sally. I had timed it right because there was an offer where I could get '3 for2', so it came to about £40 for three strips. I decided to get two dark blonde and one mid brown to give me a natural feel. According to the label they should only last about 6 months, but as I’m only planning on wearing them for special occasions and nights out hopefully they will survive a bit longer..

I've worn them a few times now, and I wanted to share a few things I've discovered to hopefully make your hair extension application stress free!

1 - Blow dry hair with a large round brush so that it’s got a bit of volume in the roots, and lightly straighten hair (not too much as poker straight would make the extensions stand out too much).

2 - Clip in the first extension as low as possible on you head - this is normally just below your ears, as you don't want the top row sitting too high on your head, as you may be able to see the clips in your parting. Section off your hair and leave a layer of hair that you will be clipping the extension to. Back-comb the roots of where the clips will sit -this will give more hold for the clips and they shouldn't slide out as easily. Continue to do this for the other layers, making sure you leave enough of your own hair on top to cover the clips.

3 - Whether you want your hair curled or straight, I think it’s always best to style it after the extensions are in. This was you can see exactly where they are sitting and both the extensions and your natural hair will blend together nicely!

E x

Must-Have Makeup Brushes

I am now the new proud owner of the Bobbi Brown Winter special brush set, which comes in a lovely leather travel case. For years I've been using a mismatch of brushes I've picked along my makeup life - freebies with other purchases and the random buys from Boots. But now, my make-up life is complete.

The set comes with 7 brushes (two of which are double ended). Here’s a quick round-up of my top three brushes in the set:

1 - The foundation brush. I've never been a fan of foundation brushes, having the opinion that they waste the product and would leave the makeup looking streaky and thin. But this brushes applies my foundation perfectly. I know it has a lot to do with what product you are using (I'm using Clarins Skin Illusion at the moment), but I believe that this brush has helped the appearance finished look. The brush is sturdy yet soft, giving a clean, even finish.

2 - The 'blender' brush. This is a thick eye shadow brush that works excellently with blending into
your eye socket. My favourite eye-makeup look is to have a lighter shade on the inner corner of your eye, then using a darker shade in the outer corner of your eye. When I want more of a dramatic look I use this blender brush right in the eye socket, sweeping up to the brow line so the colour gets less intense. I have often found that you get less colour on your eyelid when you use a brush as opposed to using you finger, but I don't have a problem with creating a deep colour with this brush.

3 - The angled eye brush. This small brush is made of quite hard, wirey bristles which I wouldn't advise using too heavily on the eye area. However it is perfect for creating bold and perfectly shaped eyebrows to frame your face. Over the past year I have converted from using an eye-brow pencil, to using a brown matte eyeshadow (currently using Revlon’s Rich Sable) as it creates a powerful shape, but the soft texture still flatters the face.

I know I was only going to give you my top three, but these brushes are just too good not to get a mention. The eyeliner brush (with the metal cover), is brilliant when paired with the Bobbi Brown Gel eyeliner and it is just the right size for creating a small line in the inner corner then a powerful cat eye flick in the out edges. Also, the double-ended concealer brush is the perfect combination using liquid concealer and translucent powder - making those dark under eye circles and spots just disappear!!

And, believe it or not, this set has actually speeded up my makeup routine in the morning. Bonus!

E x